Thursday, March 08, 2007

Valentine's Cookies

Hi Everyone,

I know I am late posting this, but the cookies were so pretty I just had to share. I made these cookies for my daughter's kindergarten class for her 6th birthday, which is also Valentine's Day. They were a huge hit with all the kids, and I stayed with the class for the day and we had a great time doing some special Valentine projects. For her birthday party I made giant heart cookies for the kids to decorate with orange or yellow icing, which was a request from the birthday girl.

Here's the recipe: ( got it from a friend years ago)
3/4 c. butter
1c. sugar
2 eggs
1 t. vanilla
1t. baking powder
1/2 t. salt
3 c. flour (I use about 2 3/4 cups - I just play with it until I get the right consistency)

Cream together butter and sugar, add eggs and vanilla. Mix in baking powder, salt and flour. Chill 1 hour or until firm. Lightly flour surface and roll out 1/4" thickness. Place on greased cookie sheet, I don't think I have ever greased the cookie sheet. One recipe yields 10 large hearts (not shown) or a couple dozen regular hearts (shown). Bake at 375 for 8 - 10 minutes. The recipe for the icing was from the package of Rogers Icing Sugar. It turned out great, and was easy to work with.

Enjoy,
Marcia
Posted by Picasa

Monday, February 12, 2007

Blog Candy

Hello Everyone,
Seems like everyone is either giving away blog candy or receiving it. Relax I am not giving any away today. I would like to let you know about someone who is. Erika is giving away an entire stamp set! Wow! You can find her blog here. Please let her know I sent you.
Thanks,
Marcia

Sunday, February 11, 2007

Hello,
This is the card I made for my mom's birthday this past December. It is called a viewmaster card. The windows say daughter, sister, wife, mother, grandmother, special friend. I cried when I made it and she cried when she opened it.
The colours I used were blush blossom, true thyme, cranberry crisp, and very vanilla. The stamp sets I used were All About You, Everyday Flexible Phrases, Expressive Flexible Phrases, and Floral Background. I rubbed true thyme and cranberry crisp on all the edges to give a dirty vintage look to the card. My mom loved it and I loved making it for her.
Thank you Kerry for the great layout and for letting me case your card. I just changed the colours to make it more my style.
Marcia

Tuesday, December 05, 2006

Hi Everyone,
This is the card I made for a Winter Mini Swap with a group of Stampin' Up! demonstrators. I also participated in the card sketch challenge (although I still need to upload to the gallery) on Splitcoaststampers. This is SC70, you can click on the card sketch challenges on the homepage.

I used my new stamp set Carte Postal, the new jumbo wheel leaves a la carte, and the french flair background stamp. I used pale plum cardstock for the body of the card; mellow moss, chocolate chip, and whisper white was used for the focal point. I also used whisper white craft ink to stamp the background stamp on the right side, and used perfect plum jumbo ink cartridge to stamp the jumbo wheel image on the left side.

Chocolate grosgrain ribbon was adhered between the two background sections to seperate and add distinction. The flower has been stamped, and punched out using the 1 1/4" circle punch, and a stampin' dimensional pops it up with flair. A hodgepodge aged copper brad finishes off the focal point while the "mon amie" inked in chocolate chip finishes off the card. Thanks for looking, enjoy.
Marcia

Tuesday, November 21, 2006

Slideshow

Hello Everyone,

Unfortunately I am removing my slideshow from my blog. Recently when you click on the slideshow it sends you to another site, in which there are unsavory links/pics that you can go to, plus some of these unsavory links/pics can be put onto my blog. This is not the direction that I want to take my business to, nor do I wish to promote this type of thing. So for now I am removing my slideshow. Thank you for looking at my blog.

Marcia

Monday, November 13, 2006

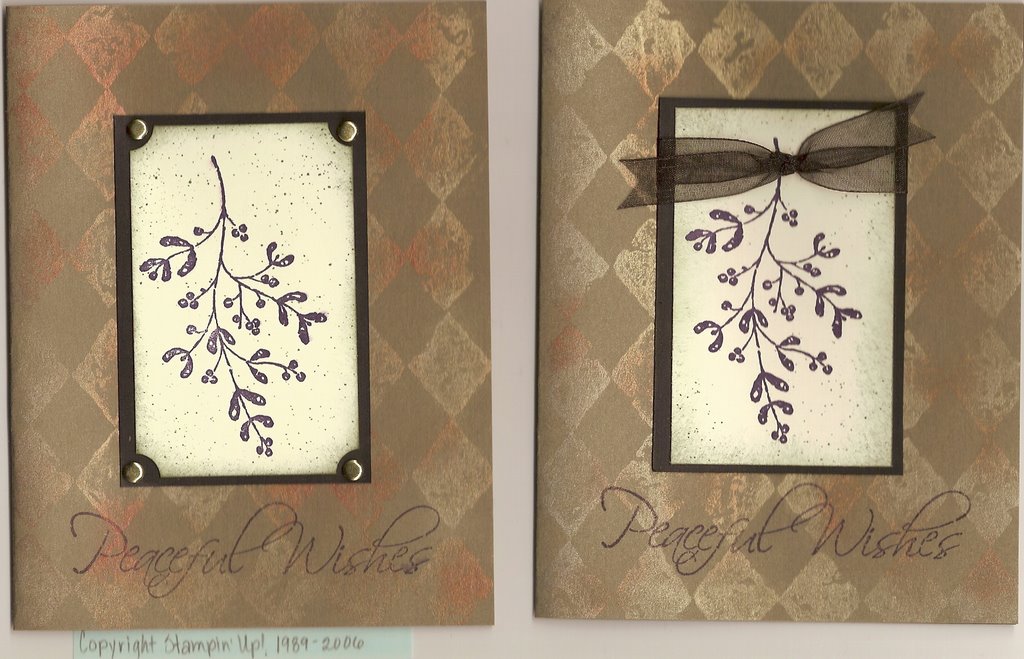
This is the other card we did at our last club night last thursday. The technique for the background is called "Poppin' Pearls". We stamped the background Print Pattern on true thyme cardstock with VersaMark Ink. Then we dipped our sponge daubers into interference gold pear ex powder and with a light touch pouced over entire stamped area, we then used a swiffer cloth to wipe away excess powder. We added a second pearl ex powder in spots randomly over top of the first powder. After using a swiffer cloth again, we then sealed with hairspray (it is important to seal the image as it will rub off if you don't - an acrylic sealer is better, but we didn't have any at the time). We then stamped our focal image on very vanilla cardstock, sponged the edged, used the color spritzer with always artichoke marker, and adhered it to the page. The ladies could either pick a ribbon or use brads to finish it off. We then stamped Peaceful Wishes in basic black classic ink on top of the background. Everyone really like the finished product when they were done. It is really shimmery in person.
This is the tree fold card we did at our club night last thursday. Everyone used Stampin' Up! Designer Series Holiday Thyme paper and using some complicated folds, created a tree fold card. Thank you Kerry, my upline, for this great idea.
These are the instructions as given to me by Kerry. There are four squares of the designer series paper, and a small piece for the trunk. The sizes are 1 1/2", 2", 2 1/2", and 3 1/2". Using your bone folder fold the square in half into a rectangle both ways so you have what looks like 4 squares. Then fold into a triangle both ways - so it is folded in half both ways. It has now been folded in half every which way it can be folded in half. Then fold back into a rectangle - holding the paper with the fold on top, push in the sides to make a triangle. Take the two corners from the top triangle and fold them to the center fold until they meet at the crease line...then layer them on cardstock to create a tree.
Have fun!
Marcia

P.S. Thank you Kerry for the wonderful idea for this card, great instructions, and layout! Everyone enjoyed making this card. I think they are looking forward to wowing their friends and family.